Engineers and designers for major transportation projects, city roads and land development projects expect immediate results during the design phase. Using corridors in Civil 3D can help streamline the design phases and manage change more efficiently throughout. Alignments, profiles and assemblies are not all you need to know to be efficient in designing roads.
Here we will learn a few tips and tricks when it comes to corridor modeling, specifically on how to create an intersection in a corridor.
There are two ways to create an intersection with a corridor:
- Manual - Add feature lines and/or alignments along the curb return and either use grading objects or add that feature line into the corridor.
- Intersection Design Tool - From the "Home" tab, there is an "Intersection" option that allows you to create an intersection.
Manual Method:
To begin, we have a drawing open in Civil 3D that has a feature line with elevation already set based off of the existing road and going into a parking lot at 1%. We also have a corridor in which the intersection is half of the road. Basically, we'll turn the curb return poly lines into a feature line, grade, and add the feature lines with an assembly into the corridor. Let's begin!
- We'll begin by creating an assembly. From the Home tab, select "Assembly" from the "Create Design" panel and choose "Create Assembly".
- A window titled "Create Assembly" will appear. Name the new assembly. For our example, we will name it "_CURB". Leave the default settings as they are and hit "OK".
- Place the assembly to the side of your drawing.
- Now let's add a lane to the assembly. From your Tool Palettes on the right side of your screen, select the "Lanes" tab and then "LaneSuperelevationAOR".
- Edit the properties of this lane by selecting "Properties" on the right side of your screen as follows:
- Width: 2.00'
- Side: Left
- Add it to the assembly.
- Now, let's add a curb to the assembly. Go back to your Tool Palettes and select the "Curbs" tab and then "UrbanCurbGutterGeneral".
- Add it to the assembly. That's all we need for our assembly.
- Let's go back to our drawing and turn our two curb return poly lines into feature lines. From the "Create Design" panel in the "Home" tab, select "Feature Line" and "Create Feature Lines from Objects".
- Select both of the yellow poly lines of the curb return at the edge of asphalt and hit "Enter".
- A window titled "Create Feature Lines" will pop up. Check the "Style" box and select "Basic Feature Line" from the drop-down list (if it's not already the default option).
- Next, uncheck the "Erase existing entities" box and check the "Assign elevations" box. Hit "OK".
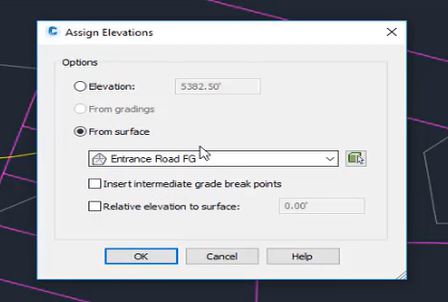
- An "Assign Elevations" window will appear. Assign the elevation based on the entrance road because it's going to pick up the elevations we're going to tie into. Do this by selecting "From surface" and then choosing your entrance road from the drop-down list (if they aren't already the default options).
- If this is not already done, uncheck the "Insert immediate grade break points" box and hit "OK".
- Select the first poly line, and choose the "Quick Elevation Edit" tool from the ribbon.
You'll see when you hover over each curb return, that the elevations are set.
- Now let's grade that poly line that we've already selected. Choose the "Set Grade/Slope between Points" tool.
- Now select the point where the curb return ties into the road, follow it all the way up the curb return, and set the slope at 1%.
- Repeat steps 16 & 17 for the other curb return.
- Now we can add these to our corridor. Select the corridor, right-click on it, and choose "Corridor Properties".
- A "Corridor Properties" window will appear. Click "Add Baseline".
- A new window titled "Create Corridor Baseline" will pop up. Select "Feature line" from the "Baseline type:" options.
- Then select the green icon next to the "Feature line:" drop-down list and click on one of the curb returns in the drawing.
- A window titled "Apply Feature Line Names" will appear. Name the feature line. In our example, we'll name it "N CR" (North Curb Return). Hit "OK".
- The "Create Corridor Baseline" window will reappear. Hit "OK".
- Repeat steps 20 - 24 for the other curb return, but for this one, we will name it "S CR" (South Curb Return).
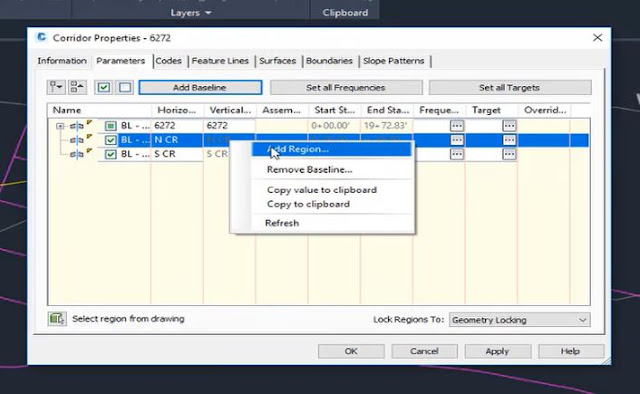
- Now we need to give the curb returns a region. The "Corridor Properties" window will reappear. Right click on "N CR" and select "Add Region".
- A window titled "Create Corridor Regions" will pop up. Under "Assembly" choose "_CURB" (this is the assembly we created earlier). Then hit "OK".
- Repeat steps 26 - 27 for "S CR".
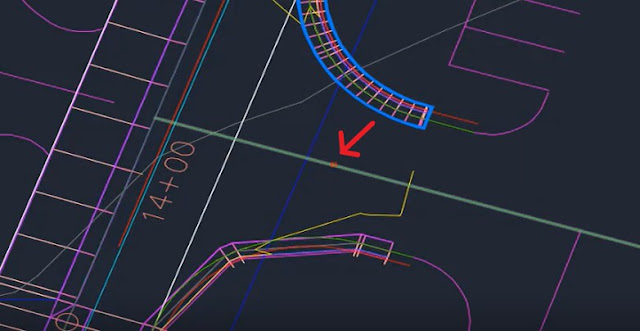
- Now we will change the starting station of the curb returns. To the left of the "N CR" line, select the "+" icon. A new line will appear that will allow us to change the starting station.
- Select the icon next to the starting station and then select the point where the curb return meets the corridor.
- Repeat steps 29 - 30 for "S CR".
- Hit "OK" in the "Corridor Properties" window.
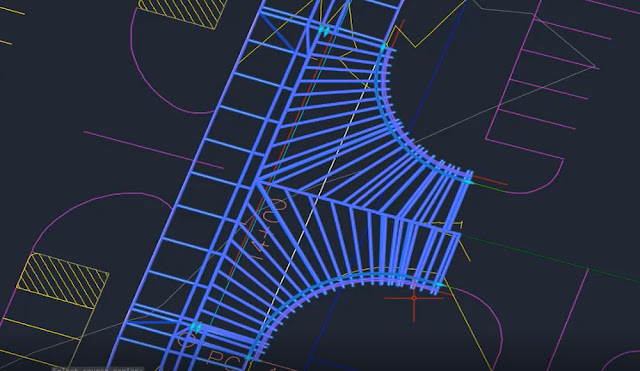
- A "Corridor Properties - Rebuild" window will pop up. Select "Rebuild the corridor". Your rebuilt corridor should look a bit like this:
*If you notice your curb return is backwards, no problem! Simply select the feature line and use the reverse tool from the "Edit Geometry" panel . - Now let's change the frequencies along the tangent. Select the curb returns and then select "Edit Targets" from the "Modify Region" panel in the ribbon.
- Select "Edit Frequency" from the ribbon and then select the north curb return.
- A window titled "Frequency to Apply Assemblies" will appear. Under "Horizontal Baseline", change the value for "Along tangents" and "Curve increment" to "2.50'". Hit "OK".
We'll come back to the other curb return in a few steps. - Next, we'll do some targeting. Select the corridor and then "Edit Target" from the ribbon.
- Pick the corridor (north curb return) within the region.
- A "Target Mapping" window will appear. We're going to start by targeting the width. Select "<None>" next to the "Width Target" line.
- A window titled "Set Width Or Offset Target" will pop up. Here we're going to target feature lines and the alignment. Let's start with the feature lines. From the "Select object type to target" drop-down list, select "Feature lines, survey figures and polylines".
- Click on "Select from drawing" and select the center feature line of that road from the screen.
- A "Target Mapping" window will appear. Select "Name the feature lines using the default name template".
- Now we'll move on to targeting the alignment. The "Set Width Or Offset Target" box will reappear. Select "Alignments" from the "Select object type to target" drop-down list.
- To choose the alignment, you can pick it from the "Select alignments:" drop-down list or pick it from the screen by clicking the green icon next to the list and clicking on the alignment from the drawing.
- Once you select the alignment, hit "Enter" and then "Add>>" in the "Set Width or Offset Target" window. Then click "OK".
- Back in the "Target Mapping" window, select "<None>" next to the "Outside Elevation Target" line under "Slope or Elevation Targets". This is going to target the elevation profile and the elevation of the feature line, not just the width.
- A window titled "Set Slope Or Elevation Target" will appear. Be sure to select "Feature lines, survey figures and 3D polylines" from the "Select object type to target" drop-down list.
- Click "Select from drawing" and select the center feature line of the road from the screen. Hit "OK".
- Next, select "Profiles" from the "Select object type to target" drop-down list.
- From here you can choose the alignment to target from the "Select an alignment" drop-down list, then select it when it appears in the "Select profiles" list and hit "Add>>".
- Then hit "OK" in the "Target Mapping" window to rebuild that corridor.
- Now, instead of repeating steps 36 - 51 for the other curb return, simple use the "Match Parameters" tool. Select the corridor and choose "Match Parameters" from the "Modify Region" panel in the ribbon.
- Click on the curb return we just targeted and then the other curb return, then hit "Enter". It should look like this:
Phew! That's it! We've been able to create a manual intersection with our existing corridor!
Intersection Design Tool Method:
Now let's take a look at how to do the same thing, but using the Intersection Design Tool. We'll start with a t-intersection drawing in Civil 3D. Be sure in future projects, that your alignment is extended to the center line alignment, or the Intersection Design Tool will not find an intersection.
- In the "Home" tab, under "Intersection" in the "Create Design" panel, select "Create Intersection".
- Find the intersecting point we're going to turn into an intersection in the drawing. For our example, we're going to use a t-intersection.
- Once you've selected the intersecting point, a window titled "Create Intersection - General" will appear. For now, we're going to leave the default settings as they are, except for the intersection corridor type. Under "Intersection corridor type", select "Primary Road Crown Maintained" from the drop-down list. Select "Next".
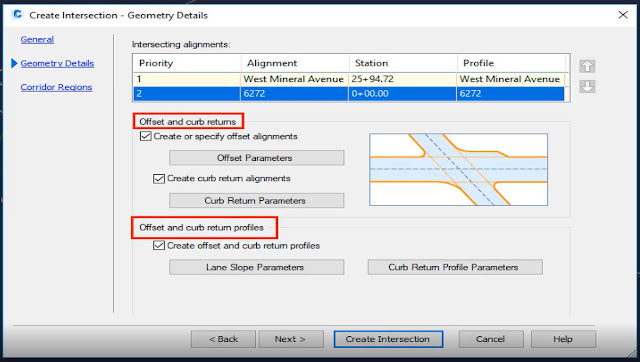
- This will take you to the "Geometry Details" tab in the same window. Here you'll find details such as priority roads, offset and curb returns properties, etc.
- Let's focus on the offset parameters first. Select the "Offset Parameters" button.
- A new window titled "Intersection Offset Parameters' will appear. Make the following changes:
- Primary Road: Left Offset Alignment Offset Value: 20.00'
- Primary Road: Right Offset Alignment Offset Value: 20.00'
- Secondary Road: Left Offset Alignment Offset Value: 14.00'
- Secondary Road: Right Offset Alignment Offset Value: 14.00'
Hit "OK". - Back in the "Create Intersection - Geometry Details" window, select "Curb Return Properties".
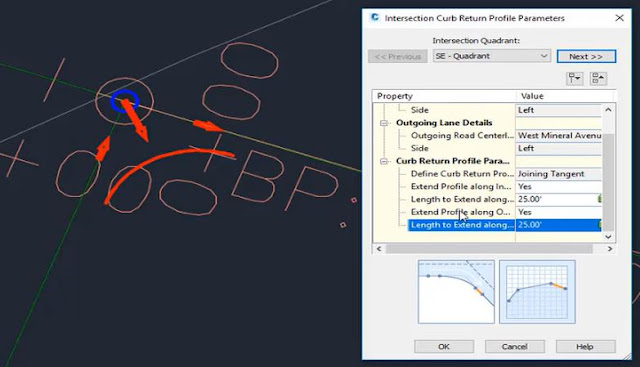
- A window titled "Intersection Curb Return Parameters" will appear. Here's we'll be able to specify how the corridor will modify the curb return. This is done through quadrants. Since we're modeling a t-intersection, there are two quadrants instead of four, like in a four-way intersection. To begin, we'll focus on the southeast quadrant by choosing "SE - Quadrant" from the "Intersection Quadrant" drop-down list.
- Check the "Widen turn lane for incoming road" box to add a widening turn lane. In the Property window, you can modify the quadrant properties. For now, we'll leave the default settings as they are.
- Repeat step 9 for the southwest quadrant and hit "OK".
- Back in the "Create Intersection - Geometry Details" window, select "Lane Slope Parameters".
- An "Intersection Lane Slope Parameters" window will pop up. Here we can identify the parameters of each slope. The "Cross Fall from Centerline" is automatically set at "-2.00%", which is where we want it, so we'll leave it as it is. Hit "OK".
- Back in the "Create Intersection - Geometry Details" window, select "Curb Return Profile Parameters".
- An "Intersection Curb Return Profile Parameters" window will appear. Here we can adjust some of the properties to our curb returns. Again, we're going to leave the default settings as they are. Hit "OK".
- Back in the "Create Intersection - Geometry Details" window, select "Next".
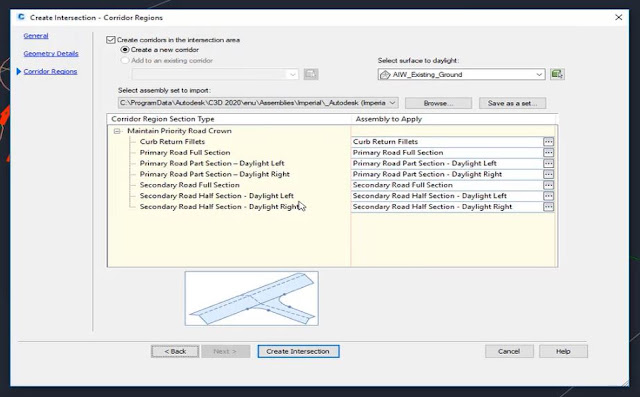
- This will take you to the "Corridor Regions" tab in the same window. In this tab, you're able to create a new corridor, add a new corridor, as well as a list of the assemblies and subassemblies that are being used to create the corridor.
If you have a preset list already or a standard intersection that's already built, you can use that over and over. If not, you can highlight the itmes on the "Corridor Region Section Type" to see what cross section or assembly it will create and where it will be applied. For this example, we'll select "Primary Road Full Section", leave the default settings and select "Create Intersection."
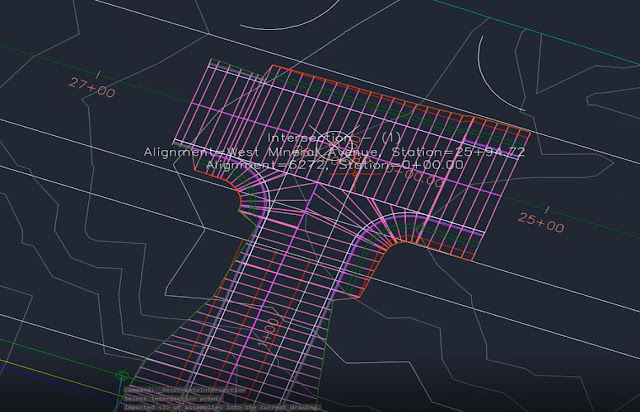
As you can see, we have the corridor, alignments, profiles, and the widened lanes and their alignments.
It's quite a lot of information to manage, but you can see that we've created a lot of information very quickly and very easily in a shorter amount of time than doing it manually.
For more Civil 3D tips, click here.














Comments
Post a Comment