Our very own Ethyn Roux wrote an article for the March 2020 edition of Augi World Magazine. Here it is:

This is an introduction showing how to create a photoscene to 3D image application. It is similar to what Autodesk ReCap would do, but the authentication and processing will be handled in a web browser with the help of Application Programming Interfaces (API’s) offered by Autodesk Forge (It also doesn’t use Autodesk Cloud Credits). This allows us to use said tools within our own applications, then to build on, and customize those tools to best meet the needs of a project or an organization.
That being said, keep in mind, this intro is designed as a “get to know you” for Forge API’s. Specifically, the “Reality Capture” API. By the end of this introduction, you will know how to create a Forge app, run a basic web server, authenticate yourself, process a photoscene, retrieve the 3D mesh file, and delete the used photoscene. The introduction will be completed using a photoscene that has already been set up. Naturally, however, those who are using this for their own civil applications will want their own photoscene processed. In response to this, included will be a resource near the end of the article that will allow for expansion on the basics mentioned here.
2. Next, we will need to create an app with Forge:
a. Hover over the profile icon on the top right of the page after creating an account > click “My Apps” > click “CREATE APP”.
b. Select the “Reality Capture” API (deselect all others).

c. Scroll down until you see the “App information” section, and name the app whatever you want. I called mine “Photo to 3D app”. You may also add a description if you’d like.
d. For the callback URL, enter the following: http://localhost:3000/api/forge/oauth/callback (we won’t use it in this app). There isn’t a need for entering in “Your Website URL” as we won’t be needing this.
e. After the app is created, a new screen will reveal some new App information. Copy and paste the Client ID and Client Secret into a note (we will be using this later).

3. Get a text editor of your choice (Atom, Brackets, Visual Studio Code, etc. Pick one you like the feel of). A quick Google search for each of these will bring you to the download pages, each with their corresponding set up instructions. This will be used to open the source code so you can see under the hood of the source code, so to speak. If you’re not doing anything else with a text editor, Brackets may well be the way to go. It uses the least resources on your PC, is easy to use, and installs quickly.

a. Click on the green button that says, “clone or download”, and then click “download zip” (we will keep the default name for the downloaded folder). It will ask where you want to store the downloaded file. Make sure it’s in a place that you can easily access again.

b. After downloading the zip file, we need to extract it. To do so, go to the newly downloaded file in its location (it should look like the folder has a zipper on it) rightclick on it, and click the option to “Extract All...” it will ask where to extract to, and give a suggested path. Just hit “extract” and it will put it in the same location as the initial download.
There are 3 files essential to all of this: Package.json, start.js, and index.html
a. Open Windows Explorer. Then, navigate to the newly downloaded and extracted folder (should have the name “recap-walkthrough-photo.to.3d-master” if the default name was kept).
b.There may be a folder within a folder with the same name. Open the folder until all the files can be seen inside of it. There should be: www, gitignore, LICENSE, package, start, and a few others. Then, go to the address bar near the top of Windows Explorer and click the folder on the left. This will select the address of the folder you are in and highlight it in blue. Copy the folder address. We will use it right away.
 c. Let’s go back to the command prompt. Type "cd", followed
by a space, and paste the folder address that was just copied
after it. It should look similar to this, but only with your
folder path in place.
c. Let’s go back to the command prompt. Type "cd", followed
by a space, and paste the folder address that was just copied
after it. It should look similar to this, but only with your
folder path in place.

7. Now that the Node.js command prompt is pointing to our folder, we need to install the packages we just downloaded. Type “npm install” and hit enter. You should get a similar output to this:

8. We will now need to set up the environment variables, using the client ID and client secret we generated earlier when we created our Forge app.
a. Open the note where the client ID and secret were saved, and edit them to look like the following:
set FORGE_CLIENT_ID=<<Your client ID here>>
set FORGE_CLIENT_SECRET=<<Your client secret here>>
b. Copy and paste the edited client ID & secret into the
node.js command prompt below all of our previous
command, and hit enter. There will not be any response
like the one we got when installing the packages. It
should just jump to the next line and wait for another
command. Take note, the command may even enter
automatically when you paste it into the command
prompt. If it does this, there is no need to hit enter
again. It won’t harm if you do though.
9. Our next action will be to start the server we spent all this
time on setting up. In the Node.js command prompt, type
“npm start”. If all went well, there should be a message
that says: “Server listening on port 3000”. We can now
open a web browser and visit http://localhost:3000/.
A button will appear saying “Authorize me!”. Continue
to click through the links as the app takes you through
authorization, adding a photoscene, adding pre-selected
files to the photoscene, processing, and then viewing the
finished product. Once the photoscene is finished processing, a link will be delivered. Just copy and paste that
into a new tab in the browser, and your file will be ready
for download. Our end product should look like this:

Congratulations! You’ve just built your own app that turns
photos into 3D meshes! Now, this article itself could become
excruciatingly long if every nook and cranny about this app
was accounted for. And as mentioned earlier, this was purely
an introduction. But, to fulfill both my promise made earlier
about using your own photos, and the promise to keep this
article an introduction, I’d like to add a resource for those
of you who are eager to experiment some more on their own
time and add their own files to a photoscene: https://forge.autodesk.com/en/docs/reality-capture/v1/tutorials/create-3d-mesh-from-photos/
In addition to converting photos to 3D meshes, there are
many other things that can be done when we mix survey, and
civil data with the power of Autodesk Forge. For example,
automating mundane tasks, extrapolating pre-selected types
of data, viewing & editing some files online, converting file
types, and even customized reports, to name a few. The possibilities really are endless, and hopefully today, we’ve just
opened your mind to some of them. Make use of them. Find
ways to use them to make your life easier. Find ways to Forge
these API’s into your civil workflow.
To learn more about Forge, click here.

This is an introduction showing how to create a photoscene to 3D image application. It is similar to what Autodesk ReCap would do, but the authentication and processing will be handled in a web browser with the help of Application Programming Interfaces (API’s) offered by Autodesk Forge (It also doesn’t use Autodesk Cloud Credits). This allows us to use said tools within our own applications, then to build on, and customize those tools to best meet the needs of a project or an organization.
That being said, keep in mind, this intro is designed as a “get to know you” for Forge API’s. Specifically, the “Reality Capture” API. By the end of this introduction, you will know how to create a Forge app, run a basic web server, authenticate yourself, process a photoscene, retrieve the 3D mesh file, and delete the used photoscene. The introduction will be completed using a photoscene that has already been set up. Naturally, however, those who are using this for their own civil applications will want their own photoscene processed. In response to this, included will be a resource near the end of the article that will allow for expansion on the basics mentioned here.
GETTING SET UP WITH FORGE
1. Before much else is done, we will need to register for an Autodesk Forge account. Visit: https://accounts.autodesk.com/register to get started.2. Next, we will need to create an app with Forge:
a. Hover over the profile icon on the top right of the page after creating an account > click “My Apps” > click “CREATE APP”.
b. Select the “Reality Capture” API (deselect all others).

c. Scroll down until you see the “App information” section, and name the app whatever you want. I called mine “Photo to 3D app”. You may also add a description if you’d like.
d. For the callback URL, enter the following: http://localhost:3000/api/forge/oauth/callback (we won’t use it in this app). There isn’t a need for entering in “Your Website URL” as we won’t be needing this.
e. After the app is created, a new screen will reveal some new App information. Copy and paste the Client ID and Client Secret into a note (we will be using this later).

SETTING UP THE TEXT EDITOR
*This step is only necessary if you wish to understand the sample code of the project more in depth. If you have no interest in this, kindly skip to the next section, “The Test Environment”.*3. Get a text editor of your choice (Atom, Brackets, Visual Studio Code, etc. Pick one you like the feel of). A quick Google search for each of these will bring you to the download pages, each with their corresponding set up instructions. This will be used to open the source code so you can see under the hood of the source code, so to speak. If you’re not doing anything else with a text editor, Brackets may well be the way to go. It uses the least resources on your PC, is easy to use, and installs quickly.
THE TEST ENVIRONMENT
4. To run our simple web server, we are going to need Node. js. You can Install it by visiting: https://nodejs.org/en/download/. Once there, we will see a few options. Make sure that “LTS Recommended for most users” is selected. Find the OS you’re using and get the installer for either 32/64-bit, depending on what you’re using (most systems nowadays are 64-bit, so this is a safe bet). Follow the prompts to finish downloading and installing Node.js.
SOURCE CODE
5. We are going to need the source code, and associated packages to run our project. So, let's get the source code from githubat: https://github.com/Autodesk-Forge/recap-walkthroughphoto.to.3da. Click on the green button that says, “clone or download”, and then click “download zip” (we will keep the default name for the downloaded folder). It will ask where you want to store the downloaded file. Make sure it’s in a place that you can easily access again.

b. After downloading the zip file, we need to extract it. To do so, go to the newly downloaded file in its location (it should look like the folder has a zipper on it) rightclick on it, and click the option to “Extract All...” it will ask where to extract to, and give a suggested path. Just hit “extract” and it will put it in the same location as the initial download.
There are 3 files essential to all of this: Package.json, start.js, and index.html
PUTTING THE SERVER TOGETHER
6. Open the node.js command prompt by pressing the Windows key and typing “node.js command". It should now show up. Make sure to run this as an administrator, as we will need to install some packages. The easy way to tell is by looking at the title of the command prompt after opening it. It must say “Administrator: Node.js Command Prompt” (Keep this instance of the Node.js command prompt open, as we will need to perform multiple operations in it). Once opened, we need to navigate over to the folder where we put our source code earlier, and grab the folder’s address and use it to point our Node.js command prompt to it. To do so, we need to:a. Open Windows Explorer. Then, navigate to the newly downloaded and extracted folder (should have the name “recap-walkthrough-photo.to.3d-master” if the default name was kept).
b.There may be a folder within a folder with the same name. Open the folder until all the files can be seen inside of it. There should be: www, gitignore, LICENSE, package, start, and a few others. Then, go to the address bar near the top of Windows Explorer and click the folder on the left. This will select the address of the folder you are in and highlight it in blue. Copy the folder address. We will use it right away.

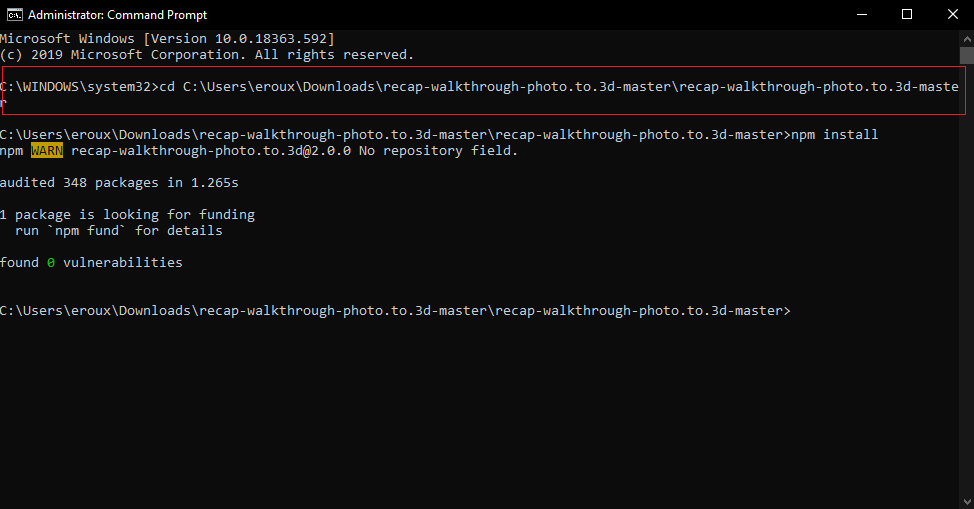
7. Now that the Node.js command prompt is pointing to our folder, we need to install the packages we just downloaded. Type “npm install” and hit enter. You should get a similar output to this:

8. We will now need to set up the environment variables, using the client ID and client secret we generated earlier when we created our Forge app.
a. Open the note where the client ID and secret were saved, and edit them to look like the following:
set FORGE_CLIENT_ID=<<Your client ID here

Create Your Own Photo To 3D Mesh App Using Autodesk Forge >>>>> Download Now
ReplyDelete>>>>> Download Full
Create Your Own Photo To 3D Mesh App Using Autodesk Forge >>>>> Download LINK
>>>>> Download Now
Create Your Own Photo To 3D Mesh App Using Autodesk Forge >>>>> Download Full
>>>>> Download LINK XE