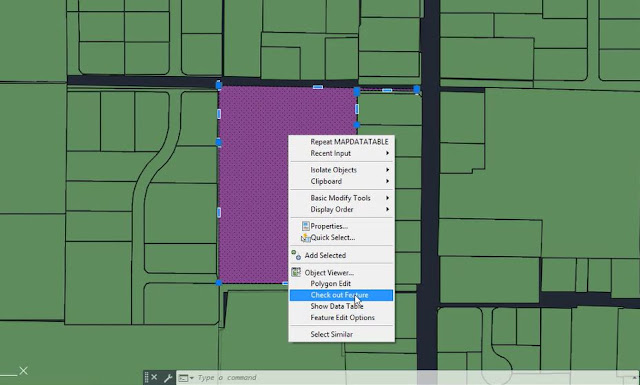
Importing shapefiles has never been easier! In this example we will import shapefiles, check out a certain plot of land and use the parcel to layout a subdivision concept plan.
At this point, you can convert the polyline to a parcel and use the parcel layout tools to create a quick concept plan!
- Drag and drop Shapefiles onto your screen. (If your coordinate zone is already pre-set, it should project/re-project as needed.)
- To bring up your task pane: Key in "MAPWSPACE" and turn on your taskpane.
- To show a data table: Select a parcel, right click and select "Show data table".
- From here you can do a filter:
- Filter by "PARCELID"
- Key in a parcel you want to use, right click on it in the data table and zoom into it
- Right click on the map object and select "Check out Feature". This will allow you to use it as a Polyline and then turn it into a parcel.
- From here, you can explode it and explode the features around it.
Optional: You can also get rid of the TaxParcel by removing the layer.
At this point, you can convert the polyline to a parcel and use the parcel layout tools to create a quick concept plan!
If you would like to see the full video tutorial, please visit our YouTube channel by clicking the video below.


How To Import Gis Data (Shapefiles) >>>>> Download Now
ReplyDelete>>>>> Download Full
How To Import Gis Data (Shapefiles) >>>>> Download LINK
>>>>> Download Now
How To Import Gis Data (Shapefiles) >>>>> Download Full
>>>>> Download LINK ih