Once again, our Consulting and Services Manager Shawn Herring's insight was featured in this month's AUGIWorld Magazine. Below is a copy of the article:
There are a lot of little things that go unnoticed in Civil 3D. Probably due to the fact that there are a million icons and commands! Whether they are hidden away within your Toolbox, or several layers deep within the ribbon, there are some really good tools that are often overlooked. Here are some of my favorite little tasks, some new, and some oldies but goodies!
Profile Crossing Tool (New in 2019)
This is a great tool added to 2019.2. You can add crossings to profile views to
identify where linear objects cross the profile relative to the parent
alignment. This takes the Project
Objects tool just a step further.
You can use the profile crossing tool add crossings and
labels to profile views for the following types of objects:
- Alignments
- Profiles
- Feature lines
- Survey figures
- 3D polylines
When you add crossings to a profile view, you specify which
marker and label styles to apply to the crossings. You can set up unique styles
for each type of crossing object so that you can display and label them differently.
I’ve been using this often for intersection/crossing
alignments. Crossing alignments are
shown as vertical lines in the profile view because they do not have
elevations, but you can specify an elevation value for the crossing alignment
labels.
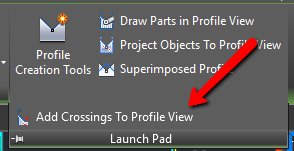
Select your profile view and now on the ribbon, under the
Launch Pad panel, you will find the ADD CROSSINGS TO PROFILE VIEW command.
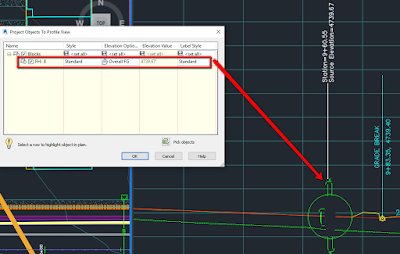
You then select the object(s) you wish to project, evoke the
command, and you get the dialog box shown below. For example, the alignment can be projected,
and crossing markers, label styles and auto or user set elevations assign!
Project Objects to Profiles
This has been around awhile, but don’t forget about this
tool. You can select a profile view,
from the Launch Pad panel of the ribbon, select Project Objects to Profile View
and pretty much add any object to your profile!
This is especially helpful when needing to see the elevation
of a feature line for example (I use feature lines for dry utilities), or when
you want to project a test pit/bore hole info into profile. You can also use this for projecting 2D
objects. For example, if you have a
streetlight, sign or fire hydrant block, you can select your view, launch the
command, and project the block, along with customized label, into your profile.
Transparent Commands (Now in Ribbon)
I don’t see transparent commands used as much as I used
to. Maybe Civil 3D introduced the
ribbon, people turned off the toolbar?
Not sure, but now the transparent commands are located on the ribbon!!
Making them easier to read and simple to use.
A couple of the ones I use often are:
1.
POINT OBJECT – When drawing
breaklines, feature lines or for any reason you want to snap to the node of the
point, and pick up the elevation, USE THIS!
You don’t have to snap on the actual node, just select any part of the point
label or point marker and it knows what to do from there!
2.
POINT NUMBER – Want to draw a line
snapping from point to point in sequential order? Just evoke the command and key in the numbers
(i.e. 212-272)
3.
PROFILE Tools – There are several
great commands for laying out items in plan or profile. Give some of them a
shot sometime!
Compare Drawings
Compare two
revisions of a drawing!!
I think this is a fantastic addition to AutoCAD based
products such AutoCAD Civil 3D. You can
now quickly review changes to drawing features such as 2D linework, Civil 3D objects
(Pipes, Surfaces, etc), text, and pretty much anything within your
drawings. It’s available in the main
Application menu when no drawing is active or under Drawing Utilities when
there is a drawing active. You can also access it from the new Collaborate
ribbon tab.
Once you select DWG Compare, the dialog box will ask you to
select which 2 drawings to compare, it will then create a third drawing with
the two overlaid. Prior to selecting
COMPARE, you can modify the color choices if you wish.
The results of the comparison are displayed in an
automatically created third drawing. Three categories of objects, or parts of
objects, are displayed – those which are located only in the first drawing
(GREEN), those which are located only in the second drawing(RED), and those
which are identical in the two drawings (GREY).
A contextual Compare ribbon tab lets you to control the
appearance of results. This tab has three groups of controls–Comparison,
Compare Filter and Change Set.
Again, this may seem like a simple task, but for quick
reviews, client/city meetings and simple clashes, this tool is a great addition
for 2019!
Export Linetypes to .lin file
Why is this not a built-in function of AutoCAD you ask? WHO KNOWS!!
Many times you have linetypes in a file but not the associated linetype
file (.lin) But there is a fantastic FREE
tool done by Cad Studio (www.cadstudio.cz) that allows you to export linetype
definitions (incl. shape + text info) from an AutoCAD DWG drawing back to .lin
file. This tool is called LinOut
and is a simple lisp to install and use.
QGIS
We are working with larger data than ever before. Drone date and aerial imagery is now at the
tips of our fingers anytime we want them.
Some raster images can be many GB in size and resolution that Civil 3D
can’t handle. If you have ever tried to
import a GeoTiff (or other image types), and you get the “Invalid Image”
warning, then QGIS is exactly what you need!
This is a FREE open source software tool that allows you to quickly
and easily reduce the size of large images, and even translate to other
coordinate systems if you’d like. Just
go to www.qgis.org and download it.
You simply drag and drop your image into the QGIS desktop,
right click on your layer (image) and export to a new rendered image!!
Stage Storage Analysis
Need a quick volume analysis from a pond for example? Need that analysis every 0.25’ within the
pond? The Stage Storage Tool in Civil 3D
is your new best friend!
First, you need to decide what interval you need to report
on. Your surface style will control the results/interval
within the report. For example, if I
want the following pond volumes in 0.50’ intervals, I simply edit the surface
style to display the correct interval, prior to running the analysis.
After you have edited your style, select the surface you
wish to analyze, and from the Analyze panel of the ribbon, choose Stage
Storage.
This will launch the report dialog box, fill in the blanks
as needed, and select DEFINE BASIN.
You want to then select Define Basin from Polylines, and
select the Extract Objects from Surface button.
Select the surface, select DEFINE back on the dialog box and
select up to the polyline you wish to analyze.
The dialog box should reappear with your results! You can save this report to a text file, or
even better, save it as a file to be used within SSA!!
A few more hidden GEMS!
Export
Legal Description
Explore the toolbox for many reports that you can
export. You can customize these reports
as well. One that I use almost daily is
the legal description writer. This saves
me a ton of time!
Drag
& Drop Shapefiles (or other GIS data)
Did you know you can just drag and drop a Shapefile (and
other GIS data) right onto your model space screen and it imports and even
reprojects? Simple huh!! Give it a shot,
just grab the shapefile and throw it in there, see what happens!
Quick Profile / Section
I use a quick profile almost daily! Draw a line, select the line, right click and
choose QUICK PROFILE. This is a simple
way to see a profile or section with creating an alignment. HOWEVER….it is a temporary graphic, so this
would be the one and only time I tell you to EXPLODE it!! I typically do some annotation, then window
the entire profile view and explode.
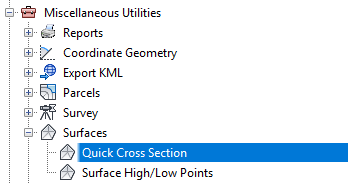
There is also a quick cross section creator. It is found on the Toolbox tab of Prospector,
under Misc Utilities and within the surface options.
Conclusion
As you know, Civil 3D can be like fishing with
dynamite! There are so many commands,
icons, ribbons and settings that you can’t conceivably know where everything
is, especially those items you use once or twice a year. Hopefully this article helped refresh your memory
on some old tools and/or introduced you to some new ones.
As always, I am interested to hear what you think and see
how we can improve upon this topic. I always
enjoy the feedback on what tips or tricks you use in your workflow.
- Shawn Herring


Thanks for the reminder about transparent commands. I should use them more often.
ReplyDeleteUnfortunately the stage storage tool is useless for any real life ponds we model.
And the new Profile Crossing Tool is glitchy. It creates "multiply owned object" errors. Also, there is no way to add a label to the Crossing after it is created. (You can set the desired label style when you create the crossing, but you should also be able to add a label afterward as you can for a "Projection".)
If you look in the "Add Labels" dialog, there is no category for "Crossing". (It should be there under "Profile View". If you look in the list it has "Station Elevation", "Depth", and "Projection", but not "Crossing".)
Thanks for your input!
Delete